
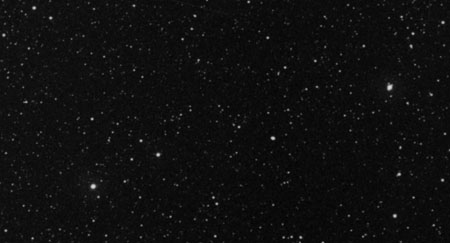
IC1396 in Cepheus, taken with a 180mm f2.8 and Ha filter
for 60 minutes, Aug 6, 1991
(AKA The Poor Man's Schmidt!)
IC1396 in Cepheus, taken with a 180mm f2.8 and Ha filter
for 60 minutes, Aug 6, 1991
Time for some context! This was a photographic technique I got into during the 1990's. I was inspired by imager Chuck Vaughn in the USA from an article in Sky & Telescope magazine. Newer imagers must remember that H-alpha wavelengths are slightly below our visible threshold in the deep red. In other words, you can't see much through these filters! When attached to a 35mm SLR camera you could not see to focus the picture. This photo technique is capable of producing very high resolution images from a given focal length, but if you can't focus?? A technique was developed that allowed accurate repeatable focus, even though you couldn't see anything through the camera viewfinder. And this is how we do this! Original page I made in 2001 follows...
My Olympus lens, like many others of this size, suffers dramatically from an optical defect called chromatic abberation. This is the lenses inability to focus light of all colours to a common point. When focused for good star images in red or green light, severe blue halos form around the brighter stars. With black and white film, this effect appears as big, blobby stars. This image is a cropped portion of a shot of the constellation Lyra. Exposure time was 5 minutes. Note how large the stars are.

In the next image, a Lumicon Hydrogen Alpha filter was used to reduce the spectrum of light entering the lens to just the deep red colours. The blue halos are gone, and the lens offers very high resolution images when it only has to image light in a narrow part of the spectrum. Exposure time was 10 minutes. (the 'dot' just right of centre is the Ring Nebula)
The Hydrogen Alpha (Ha) filter clearly offers a dramatic improvement when used with lenses which otherwise wouldn't be suitable for astrophotography. However, there is no free lunch! There are two issues to address before this filter can be used. First, Ha light doesn't focus at infinity on most camera lenses. Focus will lie somewhere between infinity and the Infra Red setting on your lens. The other problem is that you can't see anything through the filter! Not only can you not see the field in the camera viewfinder, you can't see to focus. This makes things interesting, as focus is very critical at fast focal ratios like f2.8. Note that only one film works well in Ha light, and that is Kodak Tech Pan. In addition, this film must be hypered to be of any use!
Not long after I purchased this lens, Chuck Vaughn had an article published in the February '91 Sky and Telescope magazine, page 219, which dealt with this issue. It described an indirect, mechanical focusing method using a cardboard mask which I will describe here.
First, the lens must be calibrated to focus with the filter. To do this, some type of indexing system must be added to the lens. I made a small paper scale which was marked in 1mm increments between infinity and the Infra Red position. (that small, red dot on your lens) I made this from the 'sticky part' of a Post-it Note (tm) with a fine-tipped pen and numbered the lines from 1 to 5. After sticking this to the lens, I covered it with Scotch tape to protect it. Next, I cut out a round piece of heavy paper to the diameter of the lens, and added two dime-sized holes near the outer edges of the circle.
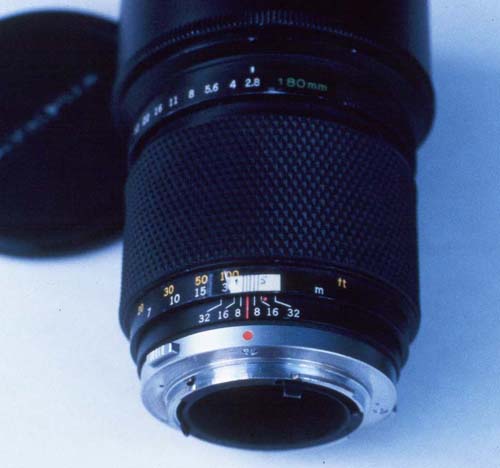
A close-up of the focusing scale. The last line (#5) lines up with the infinity
setting on the lens, when it is mechanically focused to infinity.


For my lens, sharpest focus is with the lens set to the calibration mark '3'. That's it, we are done!
Don't remove the Post-It Note, you need it for all future shots with your lens. If it falls off, you
must repeat the calibration process.
As I started taking long exposures with this set-up, it became clear that there was one more obstacle to overcome. The incredibly tiny stars promised by using an H-alpha filter were a reality, but in parts of the photo - or across most of the field - I was getting sharp lines, not sharp stars. I identified two problems, both too minor to show using normal film and exposure times. On some shots the camera would move with respect to the guide scope causing the stars to streak. Other shots had focus problems, or streaks across just part of the image. This was harder to determine the cause of, but was found to be due to the camera body bending slightly under the weight of the lens. I solved both problems by building a wooden mounting bracket that supported both the lens and the camera. The lens is held snug by a thin strip of leather, and now the longest exposures are pinpont, corner to corner.

One thing to watch for if you are using a Schmidt-Cassegrain system for guiding is mirror flop. To help reduce the chances of this, avoid shooting an object that is transiting the meridian. Try to shoot an object that is either "on the way up" or "on the way down". This will help avoid the mirror shifting under it's own weight as you move from one side of the mount to the other.
Now comes the good part - taking hi-resolution, deep astrophotos. As I mentioned earlier, you will need
to get hold of some hypered Kodak Tech-Pan and the equipment necessary for processing. (Few commercial
labs offer D19 processing but it is easy to do yourself) Pick your list of targets carefully, reflection
nebula will be rejected by the filter! Even with fast focal ratios, the Ha filter will allow you to take
very long and deep exposures. It will reject most light pollution, aurora and even moonlight, but you will
have to experiment with exposure times to suit your conditions. I have found that from a dark sky location,
at f2.8 I can easily shoot for two hours with little fogging of the background sky. Most of my shots run
about an hour, but I do plan on taking some 2 to 3 hour exposures in the future. These long exposure times allow
you to photograph very faint nebula, comparing favourably with photos taken with Schmidt Cameras. Of course, a
Schmidt can reach equivalent density on the film in much less time.... You will also need to mount the camera
very securely. I found that the weight of the lens was enough to flex the camera body and cause trailed star
images. My lens is now mounted both at the camera body AND at the lens. In addition, because the stars are so
small, your guiding must be very accurate.
The following photo was taken with my 180mm setup, of the Rosette and Cone Nebula region of the winter milky way. It was a 60 minute exposure, from a site with moderate light pollution. (The milky way was not easily visible) It easily picked up both nebula, and shows some interesting large scale structure as well (the Monoceros loop)

This photo does not properly portray the detail possible with with lens, after being optimized for Ha work. This
photo here is a detailed scan of the cone nebula region which nicely shows what
this lens can do. (77Kb) Another example of the Gamma Cygni region taken under last quarter moon can be
seen here, (180Kb) and the North America nebula
can be viewed here.
Finally, a wider field image of both Gamma Cygni and NGC7000 taken with a 135mm lens under moonlight is visible here.
Even when examining a 16 x 20 print with a magnifier, the size of the smallest stars will probably surprise you. Yes, Ha telephoto photography IS a lot of work, and the exposure times are long, but I feel that the results are well worth the effort. This technique may be all you need to save that big, dust covered lens you have from ending up on the swap table at the next star party!
| Home - New - Comets - Solarsystem - Nebula - Galaxies - Clusters - Messiers - 110 - Odds - Equipment - History |